How to Stop and Restart Tiling [to work over multiple days]
Posted January 27, 2020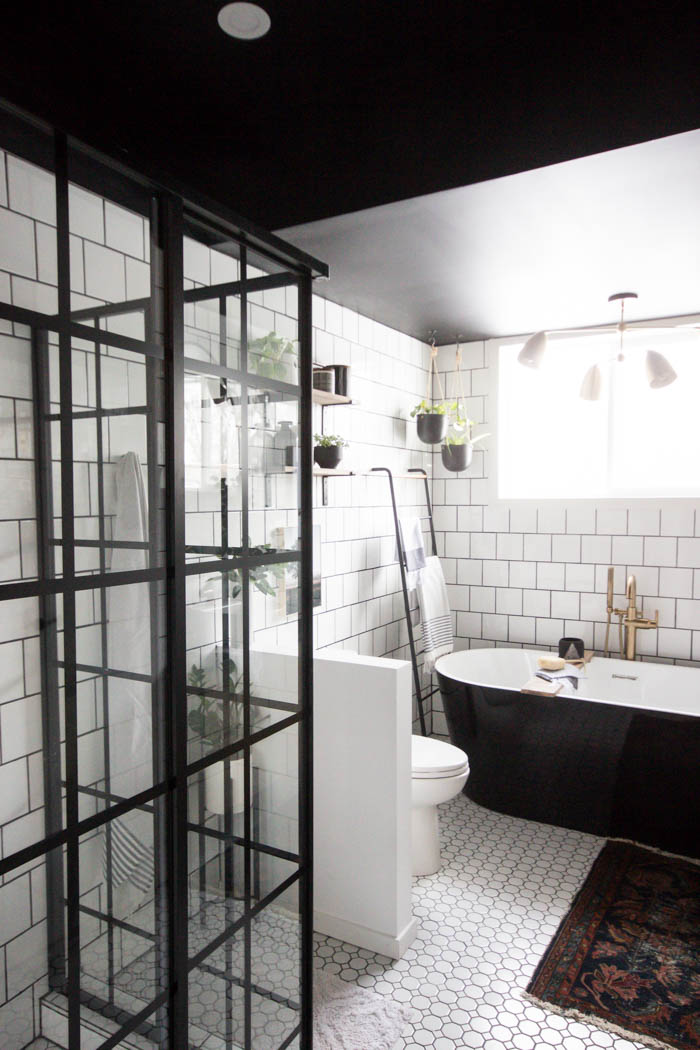
Guest post by Lindi Vanderschaaf of Love Create Celebrate
Can’t finish your tile project in one day or need to pause mid-project? There’s a right and wrong way to un-pause tiling so you can work over multiple days, and we’re sharing the right way!
Have you ever started a project, and then caught yourself in the middle, realizing you don’t have enough time to finish it? We have done this more times then we can count! Like always underestimating how much time our DIY projects will take. Or frantically trying to figure out a safe place to “pause” our renos and come back the next day. If this has ever happened to you, you probably had a minor panic attack! (We’re sure did!) With all of our tiling projects, we’ve learned a few things to help make sure that your project starts up perfectly the next day.
Why Would You Need to Stop and Restart Tiling?
You might be wondering why this matters like, “Can’t you just start earlier in the day or morning?” Well, if you haven’t done a tiling project before or are thinking about starting your first one, you’ll learn pretty fast that the biggest reason you’d leave a tile project overnight is due to the size of the space and the amount of tiling.
If there just isn’t enough time in the day, you need to find a practical way to pause your tiling job and continue the next day. Time and spacing are hard to account for, especially when you’re learning how to do it yourself and have less than three tiling projects under your belt.
Can you pause your project and tile over multiple days?
Yes! You absolutely can! But the way you choose to do it can make a big difference in your tiling looks the next day!

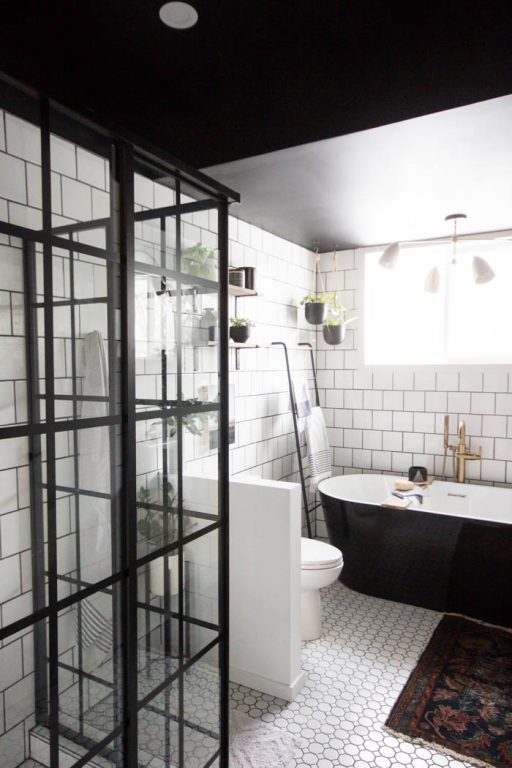
We’ve done a few tiled rooms over the years, but the one we just completed was our home office where we tiled the floors with Jeffrey Court’s 10 x 20 Hexagon tiles and the wall with their Allegro White Fan mosaic tiles. Both projects required us to stop and restart tiling in the middle of the project, and continue the next day, which made us want to share some of the lessons we’ve learned.
Here are 3 tips to help you stop and restart tiling projects:
Only mix the amount of thin-set that you need for that day.
Any thin-set that is mixed for ceramic, porcelain, or natural stone tile, and unused, is essentially garbage. Any mortar that is mixed with water cannot be used the next day and there is no way to store it that will stop the drying out process (i.e. can’t freeze it or put it in a container).
If you’re not sure how much you need, play it safe and mix smaller batches, and try to keep the same consistency each time (with the same amount of water).
Allow tile work to dry
You should always plan your tiling so that you don’t have to walk on tiles that have already been set, but sometimes when working across multiple days we need to turn and work on top of our previously set tiles.
In these cases, just make sure that the tile has had enough time to set before walking on them. Most thin-sets and mortars will dry overnight.

Make sure your final row is set properly
If you don’t read ANYTHING else, read this section! If you have to stop and restart tiling, the absolute hardest part is making sure that your completed tiles are set perfectly. If they are “off” a bit, you often won’t be able to see it with your naked eye, but the next day when you go to continue your tiling work, you may find that your gaps are much smaller in some sections and much larger in others, or that your tiles don’t fit perfectly.
Once your previous row of tiles is set and the thin-set has dried, there is no easy way to go back and “fix” them. You can’t adjust them anymore, and if you are a perfectionist when it comes to your work, this will drive you absolutely crazy every time you see it! lol.
Here’s the quick process that we use so you can learn from our mistakes!
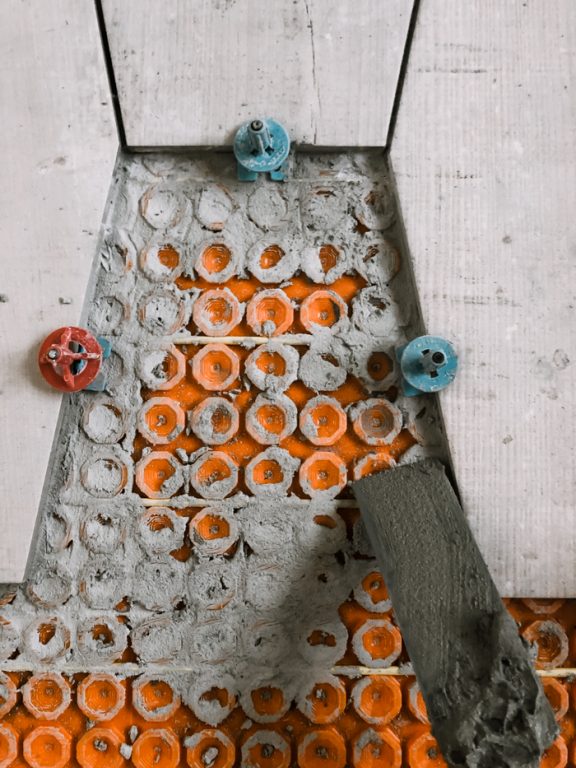
When you are setting the last row of tiles, you need to make sure that everything is perfectly clean. We use a flat trowel to clean all of the thin-set from all sides of the tile so that a new tile will sit perfectly level.
The photo above shows the tool we used to scrap the thin-set, but also shows the dry thin-set (the orange is our heated flooring mat) and the wet thin-set of the trowel (because this was the next day when we were about to start again).
If you are using the ATR spacers (which we almost always do), you will want to put your new spacers in place. They have a plate that sits underneath the tile, and you will not be able to insert that piece after the thin-set dries.
Next, after everything is clean, you want to place your next tile down for a “dry fit”. This tile does not have any thin-set or mortar on it, and it still needs to be set again the next day, but this helps hold the line of the tiles that are set, so you know everything is perfect.
Grout lines are only fractions of an inch thick. You can see with these hexagon tiles above, how easy it is for the tiles to go out a couple of millimeters. You wouldn’t even notice it was out until laying down your next row.
If you are using any type of spacer that just sits at the top of the tile, you can put those on top of your dry fit tile now to make sure that the gaps are even. Both the clean tile and spacers will be removed the next day before you put a new thin-set down.

WHAT ABOUT TILING UP A WALL?
The process is exactly the same for going up a wall or using mastic. We tiled this bathroom with simple 6″ x 6″ Fresh White tiles, but when we stopped, we added extra ATR spacers and tiles to make sure that everything lined up. If you’re out of line with straight rows like this (or with any variation of subway tile) it’s very noticeable later on!

WHAT ABOUT TILING WITH MOSAIC SHEETS?
If you are using mosaic sheet like this, you can’t really put a whole sheet in as a place holder, but we would still recommend putting in some spacers, and holding the next sheet in place briefly to make sure it all lines up nicely before letting the tile and thin-set set.
These sheets are usually a bit more forgiving because they have a mesh backing that allows for a bit more flexibility.
Clean all of your tiling tools
All you need is water to clean off your tile laying tools, but you must clean them thoroughly before the thin-set dries, or you may not be able to use them as efficiently the next day.

Can I grout across multiple days?
It’s more difficult to stop and restart tiling then to pause and restart grouting. Grouting is usually a much faster process then laying down tile, and can often be done in one day (especially if you’re working in a team like us!), but they’re still times when you want to pause grouting and continue the next day.
If you choose to pause grouting and continue after, here are some tips to help the grout blend in nicely:
- Don’t leave any excess grout, including the bits of extra grout on the edges. Make sure all of the grout is cleaned off (other than a bit of the filmy haze on the tile!) because you won’t be able to clean it easily the next day.
- Taper the edges of the grout to 1/2 the depth of the tile. This will allow the new grout sit overtop and to get a good bond to the grout that is already set.
- When possible, use grout from the same bag to minimize color variations.
- If you have a spot of grout that wasn’t cleaned properly or wasn’t caught until later, you can use a grout saw to clean up edges.
We hope this helps you get your tiling project done without feeling rushed!


