A Beautiful DIY Fire Pit
Posted December 6, 2019
Guest Post by Lindi Vanderschaaf of Love Create Celebrate
A beautiful DIY fire pit for any outdoor space or backyard oasis! Update an old propane fire table with this easy tutorial from Lindi Vanderschaaf of Love Create Celebrate.
Just in time for the holidays, to cozy up with the family admiring all your Christmas decor so carefully hung around your home. All with time to take the warm and fuzzy feeling with outdoors with this simple DIY fire pit to gather around.
Lindi shares her how-to to take an old piece and make it new again. Check out the transformation below to create your own.
This is the piece that sparked the whole project. If you look, you’ll always find people selling perfectly good things, for a lot less! This table was in great working order – it just had some damage to the top of it.

When we bought it, we only saw photos online, so we actually thought that the material on top was broken tile. Our plan was to remove and replace the tile. As it turned out, the top was not tile at all, so we came up with a plan B.
Plan B was to tile overtop of the existing fire pit tabletop. All of the “holes” would be filled with thinset as we tiled.
Materials Required
- Old Propane Fire Pit
- Thinset
- Black Tile
- Black Grout
- Clear Fire Glass
- Black Tile Edging
- Black Spray Paint
- Tile Sealer
Tools Required
- Trowels for Tiling
- Mitre Saw
- Wet Saw (possibly)
- Drill
Building a Frame for Your DIY Fire Pit
The first thing we did was build a new frame for our fire pit. This step is completely optional. If you look at the first photo in the collage above, you can see that out currently tabletop was not wide enough for three full rows of tiles. You can easily use a wet saw to cut down your tiles too, which will make the transformation that much easier.
For the frame, we cut down 2x4s. We measured the exact width we needed to add a third row of tiles (plus 1/8″ spacing between each tile). We planed the board so that it was the same width as our tabletop – that way we could add tiles across the frame and current table-top and they would be the same height.
We added an edge to hide any imperfections on the side of the fire pit tabletop, and then we stained the whole frame with a black Ebony stain, and then protected it with a polyurethane (to protect for outdoor use).
When we were ready, we used construction adhesive to adhere the tabletop to the frame.
Adding Edging to Your DIY Fire Pit
To get the best look on any tile job, add beautiful edging pieces. We recommend this great Basalt finishing piece that you can seal to match the gloss of the tile. We bought enough for the inside edge of our DIY fire pit tabletop, but if you are not making a frame, you will also need enough for the outside edge.
Cut your edging to the same length of each of your edges, and cut straight on the inside edges, but make 45-degree miter cuts on your miter saw for the outside edge if you need them.
To a dry fit to make sure that your edging pieces all fit, and then use a drill and screw right into the tabletop to hold them in place.
Tiling Your Backyard Fire Table
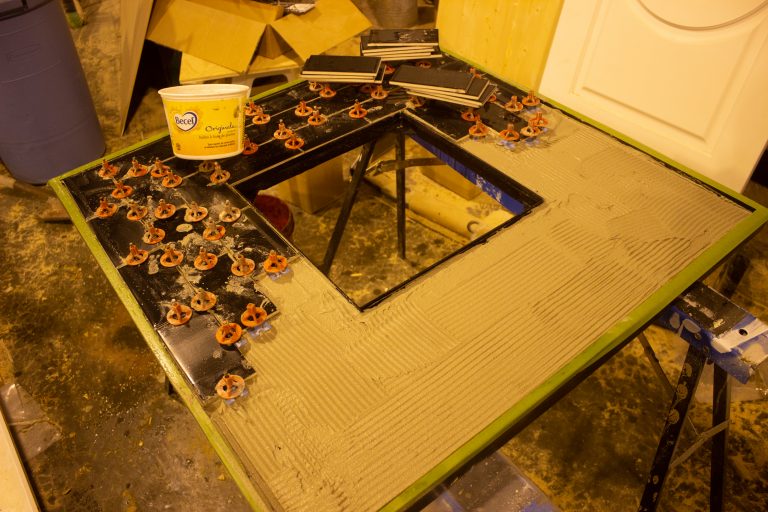
The final step is to tile and grout your table. We used this beautiful glossy black tile for our tabletop, and added a black grout to complete the modern look.
Add thinset to the entire tabletop and to the backs of your tiles as you place them. The glossy tiles can be easily scratched, so use a soft spacer, or be careful not to tighten the tops of your spacers too much or they may scratch your tile surface.
When the entire table is tiled, let it rest for 24 hours so that everything can set properly. The next day, clean the dried thin set off of the surface and then mix your black grout.

Add grout between all of your tiles. Make sure to wipe off your tiles and grout before it sets or it will be very difficult to remove later. There should just be a hazy film of grout left on the tiles when you leave it for the night. You can remove the hazy film the next day.
The final step is to seal your tabletop. Since this is going to be an outdoor table, and take a lot of wear and tear, you need to make sure that you protect it properly.
The final step, which you actually can do in any order, is to spray paint your base. Your base may not need to be freshened up. Ours had a bit of a rustic look to it, with a mix of brown and grey, and I wanted to spray paint it to make it look black, and as fresh as the rest of the fire pit.
Here is the before and after of the fire pit. When you see them side by side, you can really see the difference that the glossy black tile makes. It reflects the fire so beautifully.
Our Finished Backyard Fire Pit
Bahhhhh! I could not love this more! I cannot even express how much this simple piece transformed our backyard. The fire pit looked pretty rough when we first got it, and we completely transformed it into something modern, beautiful.
The white glass against the black tile is stunning! I’m so glad that we went with black tile and black grout.

Materials Required
· Old Propane Fire Pit
· Thinset
· Black Tile
· Black Grout
· White Fire Glass
· Black Tile Edging
· Black Spray Paint
· Tile Sealer
Tools Required
· Trowels for Tiling
· Mitre Saw
· Wet Saw (possibly)
· Drill
Instructions
Start by removing any existing fire rocks/glass, disassembling the fire pit and removing the tabletop from the base so that you can easily work on the piece.
Add Edging
1. Cut tile edging with a miter saw so that it fits on the edges of your fire pit tabletop.
2. Use a drill to secure the edging to the table
Tile the Tabletop
1. Add tile to the tabletop using thinset.
2. Use the wet saw to cut tiles as needed.
3. Allow 24 hours for thinset to set.
4. Grout the spaces between the tiles after tiles are set.
5. Allow grout to set for 24 hours.
6. Seal grout lines (as this will be an outdoor table).
Fix Base
1. If your base needs it, you may choose to spray paint the metal with a fresh coat.
Reassemble
1. Attach the base of your fire pit to the newly tiled tabletop.
2. Test to make sure that they fire pit is still working correctly.
3. Add clear fire glass to the center of the fire pit.
Notes
Re-framing the Fire Pit
As noted in the post above, we re-framed the tabletop before we tiled it so that we would have the look of three full rows of tiles and not have to cut any tiles.
This step was only personal preference and is not needed for the project to be completed.


